This omelette (well, similar versions) is served as breakfast in many casual diners in Hong Kong. The filling of this omelette obviously can be varied, depending on your likings or what leftovers you have in your fridge at the time. It's very easy and fast to make. The basic, yet MOST IMPORTANT ingredients for the filling is onion and a few spoonfuls of cream of mushroom (canned soup for convenience, or the homemade kind if you have the time, the thicker the better). It might look super easy to you, but the result is amazing. Very, very tasty! The rest of the ingredients would be completely your choice. Chopped chicken or ham and cheese would also be great additions to this delicious dish!
So, here we go, this is how I made the omelette pictured above:
Ingredients:
2-3 large eggs
a few baby spinach leaves (about 10 or so)
2 tablespoons of sweet corn (drained)
3 white mushrooms (washed, dried and chopped)
1/2 small yellow onion (chopped)
1 big tablespoonful of cream of mushroom soup (canned)
1 tablespoon of chunky, chopped tomato (canned)
1 tablespoon of olive oil
Step 1: Saute onion with a little oil over medium heat for about 5 minutes. Turn heat off, put cooked onion in a small bowl.
Step 2: Whisk eggs in a medium bowl. Over medium heat in a large non-stick pan, pour over the egg mixture, Move the pan around to get egg over the whole surface. Cook for a few minutes.
Step 3: Add cooked onion, cream soup, vegetable (except tomato) one by one onto 1/2 of the egg. Cook for about 3 minutes.
Step 4: Just using a flat spatula, flip the side of the egg that does not have filling to close the omelette. Overflowing a little is ok, it all depends on how you like it. Cook for another 3-5 minutes.
Step 5: Put the chopped tomato over the omelette after transferring to a big plate. Serve immediately!
Sunday, November 28, 2010
Saturday, November 20, 2010
Chocolate Pumpkin Cheesecake with Walnuts
Happy Thanksgiving! It's one of the biggest holidays to have a wonderful feast! A buddy at work was having her birthday around the same time, so I decided to make 2 of these wonderful, festive cheesecakes this week. One of the office and the other to take to the family gathering. They were fairly easy to make and turned out to be a party winner!
Ref from: http://www.readycrust.com/recipe_detail_template.aspx?recipeid=1174
To make 1 cheesecake (about 8-10 servings), here's the recipe:
Ingredients:
1 Large Graham Pie Crust (I used the Keebler® Ready Crust® 2 extra servings, worked great!)
2 packages of 8 ounces Philadelphia Cream Cheese
2 eggs
1/2 cup sugar
1/2 teaspoons pumpkin pie spice
1 (15oz) can of 100% pure pumpkin
1 cup of good semi-sweet chocolate chips
1/4 cup of whipping cream
1/2 cup of chopped walnuts
1-2 tablespoons of powdered sugar
Step 1: In large mixing bowl, beat cream cheese on medium speed of electric mixer until fluffy. Add sugar and spice. Beat until combined.
Step 2: Add eggs one at a time, mixing until just combined after each addition.
Step3: Stir in pumpkin and add chocolate chips.
Step 4: Pour into crust.
Step 5: Bake at 350°F for 30 to 35 minutes or until center is almost set. Cool for 1 hour on wire rack. Refrigerate for at least 3 hours.
Step 6: Prepare toppings. Melt chocolate chips in microwave for 1 minute. Mash melted chocolate with a fork or spoon. Add chopped walnuts and mix with whipping cream.
Step 7: Spread generously over the cooled cheesecake. Sift powdered sugar over the chocolate spread. That's it! Enjoy your sweet, fluffy pumpkin cheesecake!!
IRON CHEF HALLOWEEN 2010!
Sorry for the late post, there has just been too much going on in the past few weeks.
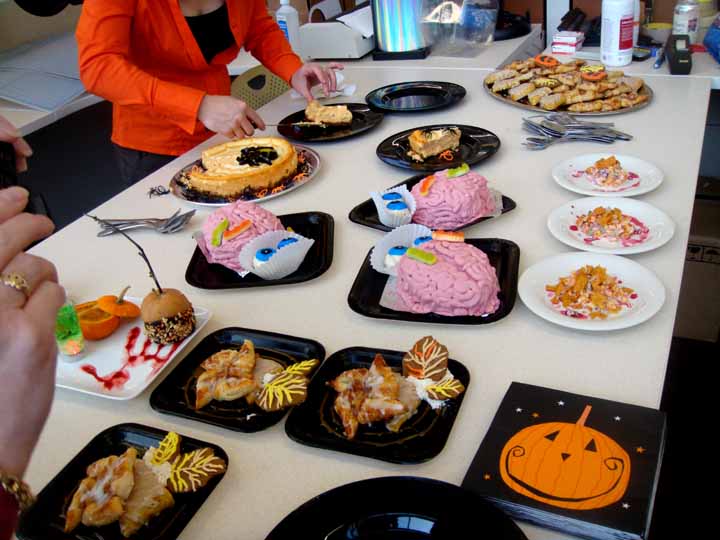
So, Iron Chef Halloween was on! We love to cook and EAT and here are some fun details and results of the great food competition this year!
1st place - Renee Biss
Dish: a Beautiful Combination of:
- Pumpkin Scream Ghoulee baked in mini pumpkins!
- Poison Caramel Chocolate Apples!
- Egg of Newt Shooter!
- Poison Caramel Chocolate Apples!
- Egg of Newt Shooter!
Comments: So appetizing! This lovely, winning presentation deserves to be on the cover of a magazine!
2nd place - Cynthia Graham
Dish: Brains and Eyeballs!!
Details: Brains were filled with a moist chocolate cake and raspberry filling iced with a raspberry butter cream. Eyeballs are orange cake balls covered in white chocolate with fondant decorations.
Comments: The vibrant colors were so welcoming and it tasted so good that it's truly work of a real chef!
3rd place - Stacy Kistler
Dish: Spiced Pumpkin Cheesecake!
Ref. from: http://www.kraftrecipes.com/recipes/spiced-pumpkin-cheesecake-62444.aspx
Stacy: To get the spiderweb effect, I just reserved some of the white batter before I added in the pumpkin and spices. I used a pastry bag to pipette the white batter in circles on top, then dragged a knife through the circles.
Comments: Delish! The winning cake was moist and melted in your mouth with a rich creamy, cheesy texture with a nice hint of spicy, fall taste. We loved it, thanks Stacy!
PRO Contestant: Debbie Chenoweth
Dish: a Wonderful Combination of Fall Themed Pastries!
Debbie: I have long been fascinated by the combination of math, science, art and creativity that is cooking in general, but that is especially so with pastries. I’m not a big fan of Halloween (I never have been, sorry!) so I don’t think in terms of scary stuff. I almost didn’t participate for that reason. But I do think of pumpkins and spices and caramel apples, so I used those tastes as my inspiration. I wanted to try my hand at pumpkin scones. These scones are full of cinnamon, nutmeg, ginger and cloves, and the spice is boosted in the glaze. The caramel apple Danish is made on a base of homemade croissant dough shaped into a pinwheel and then topped off with a spicy apple filling and caramel. The gingerbread cookies compliment the spice a bit further in the garnish.
Comments: 2 THUMBS UP! Absolutely wonderful. LOVE every single one of these pastries! Great presentation with a wonderfully fresh taste inside and out. Makes my mouth water just to think about it. Another pro in the pastry/cake category in this competition!
Food Loving Contestant: Frances Wun
Dish: Bloody Fritos Corn Salad with Maggots!Details: My famous Fritos Corn Salad with a twist of Halloween spirits. (Fritos Corn Salad recipe available at my older post here - http://cookingwithmun.blogspot.com/2010/04/mexican-chilli-frito-corn-salad-super.html). Splash of blood was made sweet beet juice which by the way, went really well with this humble, yet flavorful salad AND the maggots were simply cooked white rice with a bit of black sesame powder!
See you all next year Halloween! Woooooooohhhhhh, hahahhahhahahahahh!
Sunday, October 10, 2010
Warm Artichoke and Bean Dip
I found this recipe online a while ago for a friend's birthday last week. Since she's a vegetarian, a health food lover, I wanted to make something extra special for her. It's easy to make and it turned out to be very tasty and best of all GUILT-FREE! Cannellini beans are the secret ingredient in this low fat recipe. Try it at home if you have a small party, it's something different that works very well with tortilla chips or cut-up mini pita bread.
Source: http://www.rd.com/living-healthy/warm-artichoke-and-bean-dip-recipe-2/article171189.html
Ingredients:
1 can (19 or 15 ounces/540 or398 milliliters) cannellini (white kidney) beans, drained and rinsed
1 can (14 ounces/398 milliliters) artichoke hearts, drained and rinsed
3 garlic cloves, finely chopped
1 tablespoon reduced-fat mayonnaise
Pinch of cayenne pepper
Freshly ground black pepper to taste
2/3 cup plus 2 tablespoons grated Parmesan cheese
1/4 cup chopped fresh/dried parsley
1 teaspoon freshly grated lemon zest
Step 1: Preheat the oven to 400°F (200°C). Coat a 2- to 3-cup baking dish with nonstick spray.
Step 2: Place the beans, artichoke hearts, garlic, mayonnaise, cayenne pepper, parsley and black pepper in a food processor. Process until almost smooth, stopping to scrape down the sides of the processor bowl once or twice.
Step 3: Transfer to a medium oven-friendly bowl/dish. Site in 2/3 cup of the Parmesan, parsley and lemon zest.
Step 4: Scrape into the baking dish and smooth with a spatula. Sprinkle a few pinches of parsley and the remianing 2 tablespoons of Parmesan on top of the dish.
Step 5: Bake the dip, uncovered, for 20–25 minutes or until it is heated through. Serve warm. One serving 1/4 cup.
Step 6: Serve warm with plain tortilla chips or mini cut-up pita bread! Enjoy!Sunday, August 15, 2010
Homemade Corn Chowder with Crab Meat
This delicious, hearty chowder was inspired by Paula Deen, from the Food Channel. I love corn and this is my version of it. Adding sweet, chunky blue crab lumps and a bit of slightly spicy paprika, this soup transforms into a fancy, gourmet addition that no one can stop eating!
Ingredients:
(6 servings)
- 4 Ears of Corn
- 1 Medium Sweet Onion
- 1 12oz Fresh Crab Lump Meat
- Vegetable or Chicken Stock (3 cups)
- Corn Water (3 cups) reserved from boiling the corn)
- Heavy Cream (1 cup)
- Flour (2 tablespoons)
- Butter (1/2 stick)
- Olive Oil (2 tablespoons)
- Salt and Pepper (a few pinches for taste)
- Paprika Powder (a few sprinkles for taste and color)
Step 1: Boil corn in a tub of hot water until cooked. Keep some liquid.
Step 2: Remove corn kernels in a large bowl.
Step 3: Chop up the onion.
Step 4: In a large pot, saute onion with butter and olive oil. Let it sweat and brown up for about 5 minutes over medium heat.
Step 5: Add the dry ingredients. Over medium heat, sprinkle salt and pepper to add flavor. Then, add flour slowly as you stir. This will thicken up the mixture. Mix well. Cook for about 5 minutes.
Step 6: Add liquid to the pot. First, add corn liquid, then, chicken or vegetable stock, then crab meat. Add heavy cream last. Stir well. Let it come to a boil. Turn heat down to low and simmer for about 10 minutes.
Step 7:Serve with a few sprinkles of paprika powder. Yum! Enjoy!
Easy Mexican Vegetable Quesodilla
Howdy! I was first introduced to Quesodillas when I moved to Texas about 15 years ago. Growing up as an Asian, I'm not that big on cheese, but somehow, this little delightful appetizer really grew on me. I started making it for friends and family and it was such an easy fix for everybody. Obviously, the filling can be varied, depending on your liking. For this recipe, I just use what I have in my fridge: mushroom, olive, tomato and cheddar cheese. Simple but very tasty. What a treat!
Here's how I made it recently:
Ingredients:
(make 1 round quesodilla- about 2 servings)
- Fresh White Mushrooms (5 or 6 of them)
- 1/2 Medium Tomato
- 2 Large White Flour tortilla
- Olive Oil (a drizzle for the frying pan)
- Shredded Cheddar Cheese (1-1 1/2 cups)
- Pica de Gallo/Sour Cream/Guacomole (optional to your liking!)
Step 1: Prepare the filling. Wash and slice mushroom into very thin pieces. Chop tomato into small chunks. Set all aside in a bowl.
Step 2: Over medium heat, heat up some olive oil. Carefully put one flour tortilla flat on the pan.
Step 3: Evenly spread out mushroom slices, tomato and 1/2 of the cheddar cheese to the heated tortilla (do not overload).
Step 4: Spread out the rest of the cheese on top.
Step 5: Cover with the second piece of flour tortilla. Turn heat to low, cook for about 2-3 minutes.
Step 6: And here's the "FUN" part, flip tortilla to the other side carefully with a large flat spatula. Add a drizzle more olive oil to give it a crispy crust. Turn heat back up to medium, cook for another 2-3 minutes until golden brown.
Add 7: Cut the quesodilla with a pizza knife into even slices. Serve with pica de gallo, sour cream or guacamole immediately, enjoy!
Subscribe to:
Posts (Atom)